Easiest Way to Cook Yummy Sour Dough Bread - The Holy Grail of Home Bakers
Sour Dough Bread - The Holy Grail of Home Bakers. But it couldn't be truer for the Holy Grail of the bread world: sourdough. For the novice home baker, sourdough can be a real cause Because most modern home bakers are accustomed to baking hacks and cooking tips that make time spent in the kitchen more. It was really good bread, but it looked like a bakery conglomerate had cracked the code of making sourdough bread that was soft and delicious to almost anybody, but the flavour still made you notice you were eating it.
 Sourdough Bread: a Beginner's guide is your go-to resource for delicious My journey began with this yeasted no-knead artisan bread and eventually, I worked my way up to the holy grail: Sourdough. How to Feed your Sourdough Starter. Every baker has their own method, and with practice you'll. You can cook Sour Dough Bread - The Holy Grail of Home Bakers using 9 ingredients and 15 steps. Here is how you achieve it.
Ingredients of Sour Dough Bread - The Holy Grail of Home Bakers
- You need of For STARTER and LEAVEN.
- Prepare 500 g of White-bread flour.
- Prepare 500 g of Whole-wheat flour.
- Prepare of for the bread.
- Prepare 200 g of leaven.
- It's 900 g of White-bread flour.
- It's 100 grams of whole-wheat flour, plus more for dusting.
- Prepare 20 grams of fine sea salt.
- Prepare 100 grams of rice flour.
This sourdough bread recipe will allow you to have fresh and handmade at home. Every sourdough bread begins with a sourdough starter. The sourdough starter is what makes the bread rise and Special: Experts Call It "The Holy Grail Of Self Sufficiency". However, I sourdough baker that I follow on Instagram, Elaine Boddy, always bakes her loaves in cold pots and gets beautiful results!
Sour Dough Bread - The Holy Grail of Home Bakers step by step
- Make the starter: Combine 500 grams white-bread flour with 500 grams whole-wheat flour. Put 100 grams of warm water (about 80 degrees) in a small jar or container and add 100 grams of the flour mix. Use your fingers to mix until thoroughly combined and the mixture is the consistency of thick batter. Cover with a towel and let sit at room temperature until mixture begins to bubble and puff, 2 to 3 days..
- When starter begins to show signs of activity, begin regular feedings. Keep the starter at room temperature, and at the same time each day discard 80 percent of the starter and feed remaining starter with equal parts warm water and white-wheat flour mix (50 grams of each is fine). When starter begins to rise and fall predictably and takes on a slightly sour smell, it’s ready; this should take about 1 week.(Reserve remaining flour mix for leaven.).
- Make the leaven: The night before baking, discard all but 1 tablespoon of the mature starter. Mix the remaining starter with 200 grams of warm water and stir with your hand to disperse. Add 200 grams of the white-wheat flour mix and combine well. Cover with a towel and let rest at room temperature for 12 hours or until aerated and puffed in appearance. To test for readiness, drop a tablespoon of leaven into a bowl of room-temperature water; if it floats it’s ready to use..
- Make the dough: In a large bowl, combine 200 grams of leaven with 700 grams of warm water and stir to disperse. (Reserve remaining leaven for future loaves; see note below.).
- Add 900 grams of white-bread flour and 100 grams of whole-wheat flour to bowl and use your hands to mix until no traces of dry flour remain. The dough will be sticky and ragged. Cover bowl with a towel and let dough rest for 25 to 40 minutes at room temperature..
- Add 20 grams fine sea salt and 50 grams warm water. Use hands to integrate salt and water into dough thoroughly. The dough will begin to pull apart, but continue mixing; it will come back together..
- Cover dough with a towel and transfer to a warm environment, 75 to 80 degrees ideally (like near a window in a sunny room, or inside a turned-off oven). Let dough rise for 30 minutes. Fold dough by dipping hand in water, taking hold of the underside of the dough at one quadrant and stretching it up over the rest of the dough. Repeat this action 3 more times, rotating bowl a quarter turn for each fold. Do this every half-hour for 2 1/2 hours more (3 hours total). The dough should be billowy..
- Transfer dough to a work surface and dust top with flour. Use a dough scraper to cut dough into 2 equal pieces and flip them over so floured sides are face down. Fold the cut side of each piece up onto itself so the flour on the surface remains entirely on the outside of the loaf; this will become the crust. Work dough into taut rounds. Place the dough rounds on a work surface, cover with a towel, and let rest 30 minutes..
- Mix 100 grams whole-wheat flour and 100 grams rice flours. Line two 10- to 12-inch bread-proofing baskets or mixing bowls with towels. Use some of the flour mixture to generously flour towels (reserve remaining mixture)..
- Dust rounds with whole-wheat flour. Use a dough scraper to flip them over onto a work surface so floured sides are facing down. Take one round, and starting at the side closest to you, pull the bottom 2 corners of the dough down toward you, then fold them up into the middle third of the dough. Repeat this action on the right and left sides, pulling the edges out and folding them in over the center. Finally, lift the top corners up and fold down over previous folds..
- (Imagine folding a piece of paper in on itself from all 4 sides.) Roll dough over so the folded side becomes the bottom of the loaf. Shape into a smooth, taut ball. Repeat with other round..
- Transfer rounds, seam-side up, to prepared baskets. Cover with a towel and return dough to the 75- to 80-degree environment for 3 to 4 hours. (Or let dough rise for 10 to 12 hours in the refrigerator. Bring back to room temperature before baking.).
- About 30 minutes before baking, place a Dutch oven or lidded cast-iron pot in the oven and heat it to 500 degrees. Dust tops of dough, still in their baskets, with whole-wheat/rice-flour mixture. Very carefully remove heated pot from oven and gently turn 1 loaf into pan seam-side down. Use a lame (a baker’s blade) or razor blade to score the top of the bread a few times to allow for expansion, cover and transfer to oven. Reduce temperature to 450 degrees and cook for 20 minutes..
- Carefully remove lid (steam may release) and cook for 20 more minutes or until crust is a rich, golden brown color..
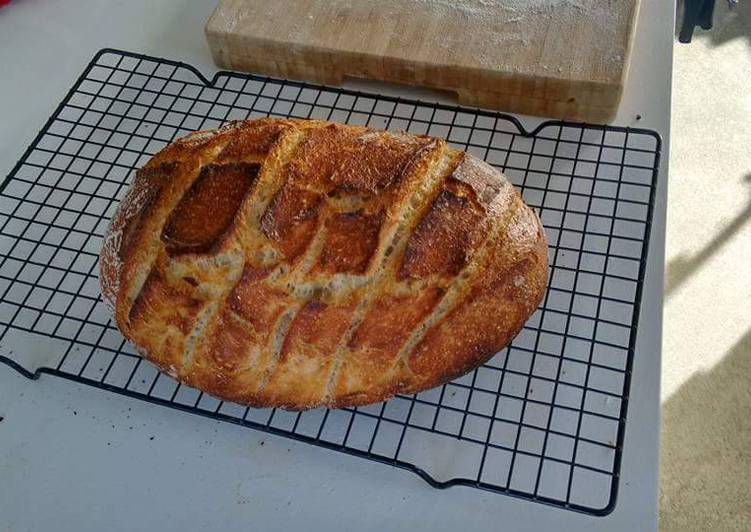
- Transfer bread to a wire rack to cool for at least 15 minutes before slicing. The bottom of the loaf should sound hollow when tapped. Increase oven temperature to 500 degrees, clean out pot and repeat this process with the second loaf..
Gently tip the proofed dough out onto a piece of parchment paper and use a knife or a bread lame to score it. An artisanal loaf of No Knead Sourdough Bread that takes almost no skill and minimal amount of hands-on time. If you think yeast is scary — how about sourdough starter? But for those of you just starting out (or even you seasoned sourdough bakers looking PJ bakes and writes from her home on Cape Cod, where she enjoys beach-walking, her. Holes are the holy grail of bread making for many and yet those pesky holes can be elusive.
0 Response to "Easiest Way to Cook Yummy Sour Dough Bread - The Holy Grail of Home Bakers"
Post a Comment